Generate a CSR
To order an SSL certificate you must create a private key on the server where the certificate is to be installed. Next, you must use the key to generate a Certificate Signing Request (CSR). This CSR includes the public key, which is required to order an SSL certificate.
Read more about how to generate a CSR for your operating system below.
 Internet Information Services IIS5 and 6
This guide will show you how to create a Certificate Signing Request (CSR) on a Windows server using IIS 5 or 6.
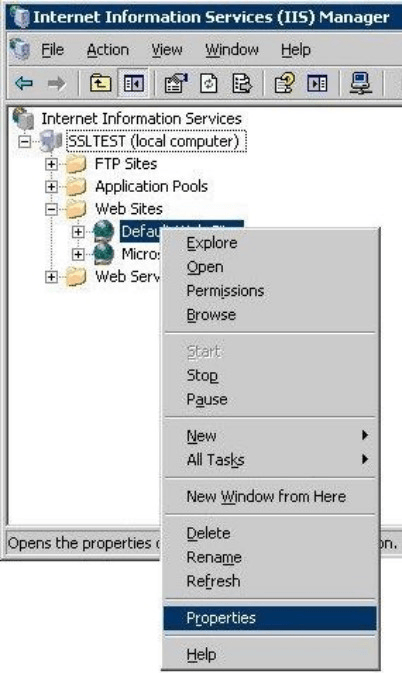
Start IIS Manager on the web-server you wish to secure. Right-click on the necessary web-site and select Properties.
Find the tab called Directory Security and click on Server Certificate.
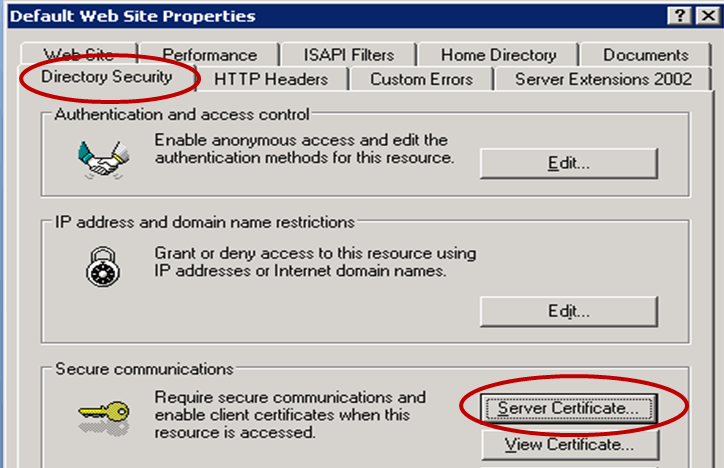
1. Server Certificate
Select Create a new certificate.

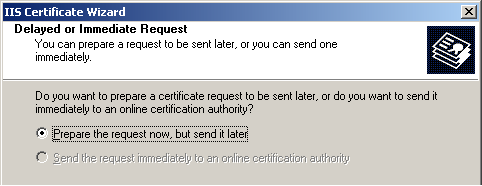
2. Delayed or Immediate Request
Select Prepare the request now, but send it later.
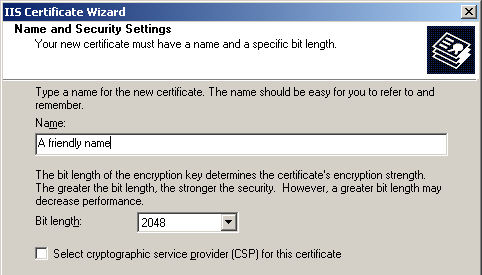
3. Name and Security Settings
Assign a name to the certificate. This is a local name, used for managing.
Note: The bit length must be 2048 bit or higher.
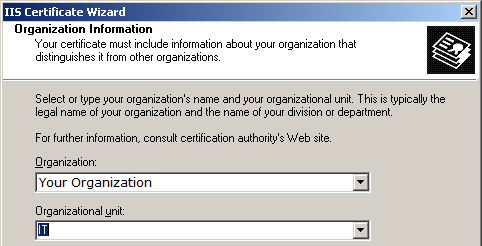
4. Organisation Information
Enter organisation information.
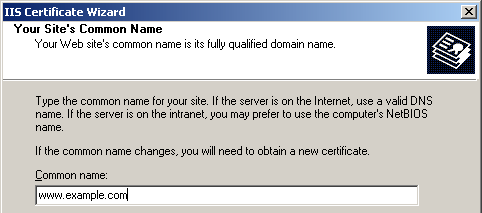
5. Your Site's Common Name
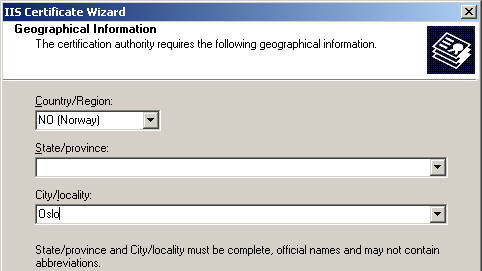
Enter basic information about your Organisation. Payment-id does not use the information supplied here.
6. Geographical Information
Enter your domain-name (FQDN) here. Payment-id will issue the certificate to this domain.
Note: For a wildcard certificate, you need to enter a wildcard character in the leftmost position. ( *.example.com )
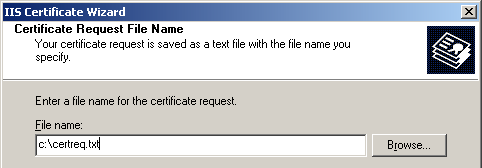
7. Certificate Request File Name
Enter basic information about your Organisation. Payment-id does not use the information supplied here. Browse for a location to save your CSR.
8. Request File Summary
You will see a summary of the content in CSR and where you place it. Click Next to continue to the next step. You will see the last window Completing the Web Server Certificate Wizard where you click Finish to close it.

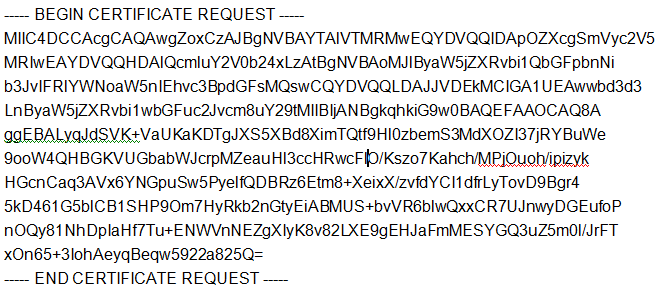
9. Certificate Request
You can now open the file you created earlier. When you order your certificate, you need to provide this information (The content includes --- BEGIN and END --- ) to Payment-id.
 Internet Information Services IIS7
This document describes how to generate a Certificate Request / Certificate Sign Request (CSR) on a Windows Server with IIS 7.
A CSR is a prerequisite to ordering an SSL certificate.
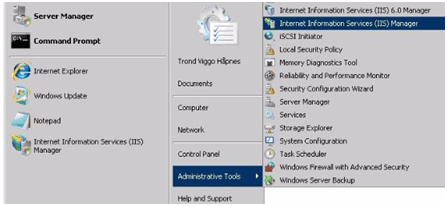
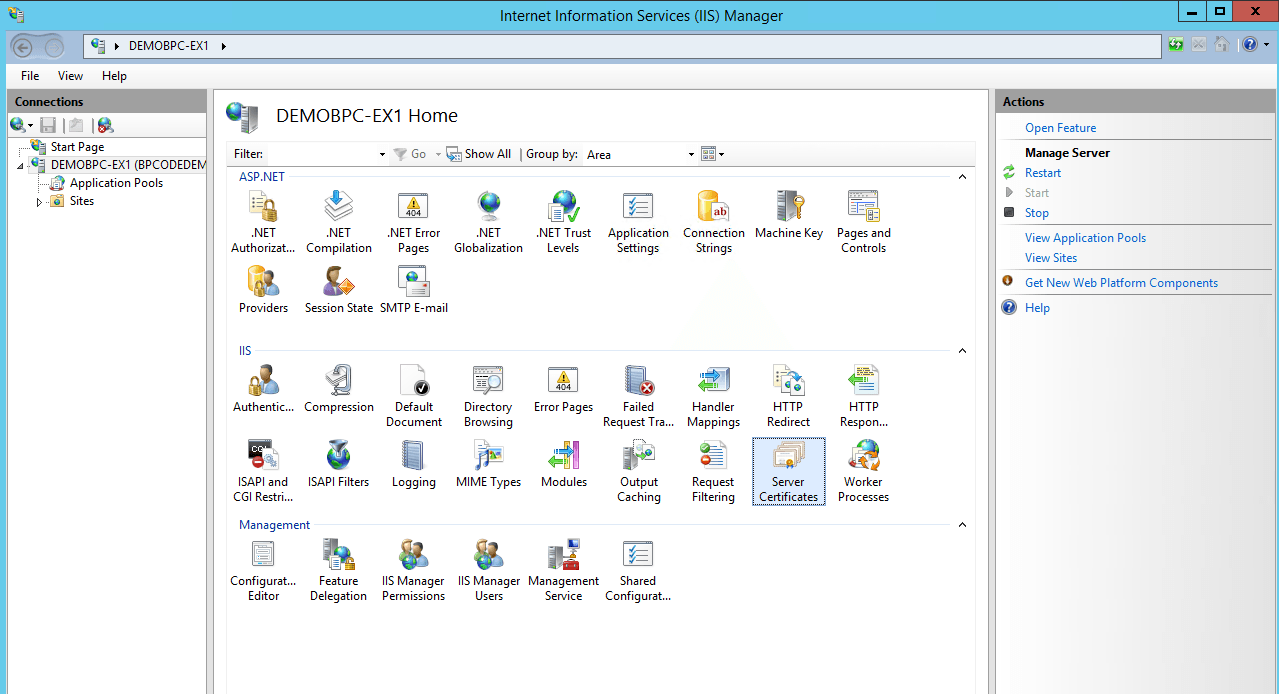
Start IIS Manager to generate a CSR on the server where you want to install the SSL certificate. You can do this by opening the Start menu. Select Administrative Tools and then Internet Information Services (IIS) Manager.
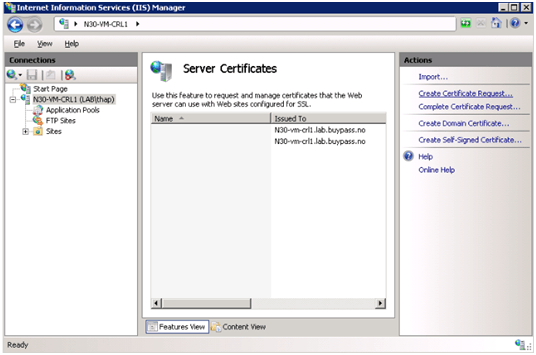
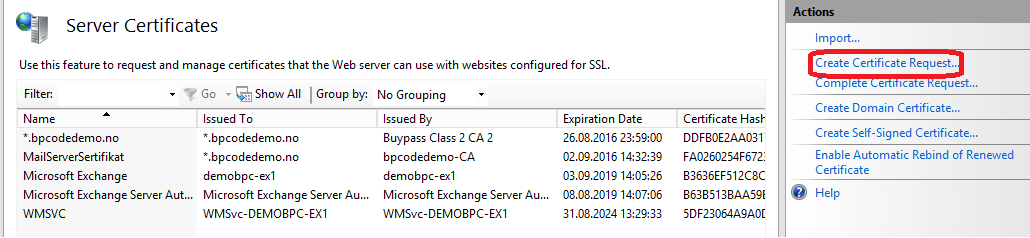
1. Server Certificates
Select the appropriate server in the left column and then double click on 'Server Certificates'. Click 'Create Certificate Request' (Actions).
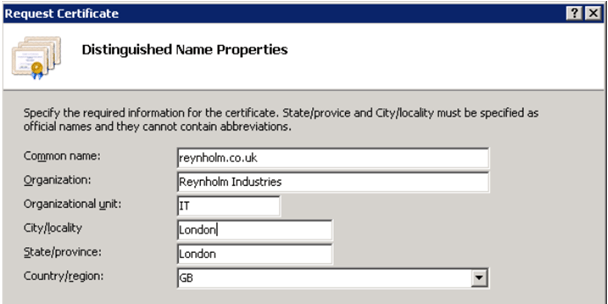
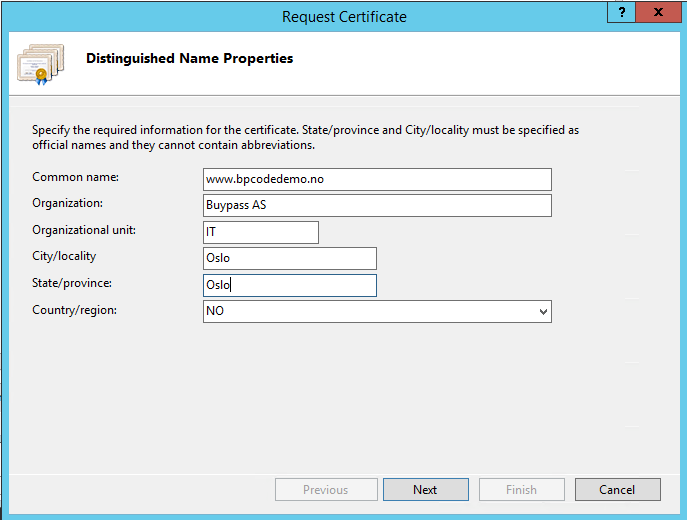
2. Distinguished Name Properties
In the next window, you can enter information about your company. The field Common Name must contain the domain name (FQDN) which you want in your SSL certificate. For wildcard certificates, the Common Name must contain a wildcard to the left (for example, *.domene.no)
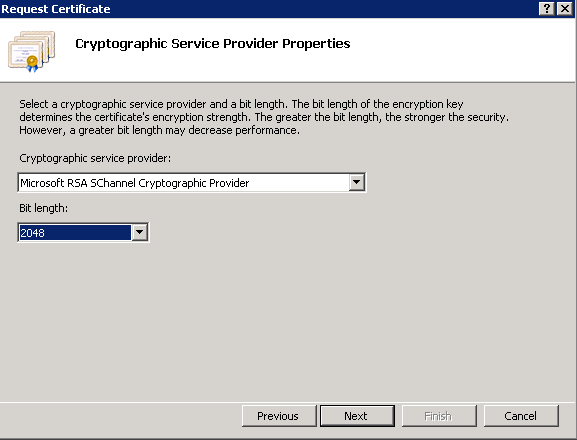
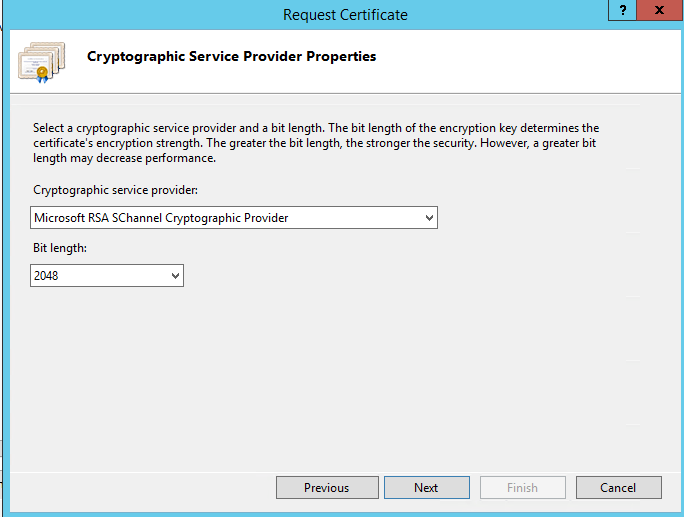
3. Cryptographic Service Provider Properties
In the following window, you need to select a cryptographic provider and the length of the private key. The key-length must be 2048 bits or more.
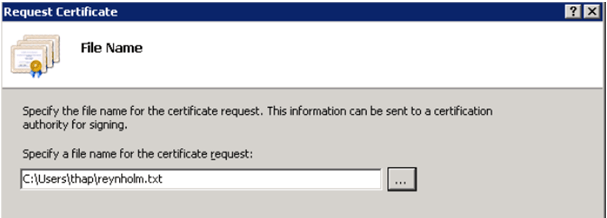
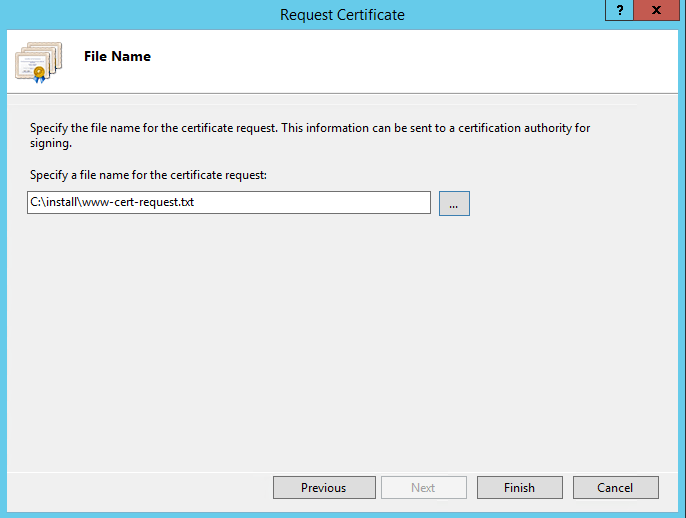
4. File Name
You can now specify where you want to store the certificate request. Click Finish to complete the process.
5. Certificate request
You can now open the file you created earlier. When ordering a certificate, you need to provide this information (The content includes --- BEGIN and END --- ) to Payment-id.
Internet Information Services IIS8 and 8.5How to create a CSR on Windows 2012 – IIS 8 and Windows 2012 R2 – IIS 8.5
From the Start screen, click or search for Internet Information Services (IIS) Manager and open it.
Click on the server name.
From the center menu, double-click the "Server Certificates button" in the "IIS" section (it is in the middle of the menu).
From the Actions menu, click Create Certificate Request.
Fill in information in Request Certificate wizard and click Next.
Choose Cryptographic Service provider and Key length and click Next.
Save request file.
 Internet Information Services IIS10
How to create a CSR on Windows 2016 – IIS 10
Linux and Open SSLThis document describes how to generate a Certificate Request / Certificate Sign Request (CSR) on a Linux Server with OpenSSL.
A CSR is a prerequisite to ordering an SSL certificate.
1. Creating the directory structure
Before you create a private key and a certificate request, you must decide in which directory you want to store the certificate. If this is already in place, you can skip to the next step.
Issue the following command in the terminal:
# mkdir -p /etc/apache2/ssl/dittdomene.noThen you need to navigate to the directory you have just created:
# cd /etc/apache2/ssl/dittdomene.no2. Generating a private key
If you already have a private key that you want to use, you can skip to the next step. The following command shows how to create a 2048-bit key, which is the minimum requirement. In this example, your private key will be stored as ‘server.key’. Make a backup copy of the key. Regenerating the key is impossible. It is also important to store the private key securely.
# openssl genrsa -out server.key 20483. Generating a certificate request
The command below is used to create a certificate request (CSR) based on the key. The certificate request is stored in the file server.csr and the key field must contain the name of the key.
# openssl req -out server.csr -key server.key -newBefore you can generate the file with the CSR, you must enter the information as shown below. Common Name must contain the actual domain name (FQDN ) where to use the SSL certificate. Email address, Challenge password and company names are optional.
> Country Name (2 letter code) [AU]: NO
> State or Province Name (full name) [Some-State]: Your Province
> Locality Name (eg, city) []: Your City
> Organization Name (eg, company) [Internet W. Pty Ltd]: Your Organization
> Organizational Unit Name (eg, section) []: Your section
> Common Name (eg, YOUR name) []: yourdomain.com
> Email Address []:

> Please enter the following 'extra' attributes to be sent with you certificate request
> A challenge password[]:
> An optional company name[]:
4. Certificate Request
When ordering a certificate, you need to upload the CSR. Do so by copying the content of your newly generated CSR (server.csr). To get the content of the CSR, use the following command.
# cat server.csrThe CSR will look approximately as follows and will include --- BEGIN and END --- ).


